An Overview of the Web Translator…
First, before I start diving into any features or giving you any screen-shots I’d like to point out that this was made from scratch by Soywiz who is the hacker for the Tales-Translations team. As you will soon be seeing he is very skilled and deserves respect. 😛
Now onto the Translator itself. Let it be know that this does require a login, and no I’m not giving you the address. 😛
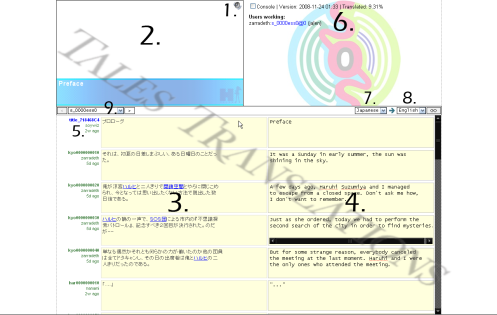
Now I know the numbers are a bit jumbled, I admit I didn’t really have a plan of attack while I was adding them, but either way this is the main interface and here’s a description for each number.
1. This useful little button (the speaker) will play whatever voice file from the game that goes along with the currently selected dialog entry. If you’re not exactly sure what the text is suppose to translate to, or you work better with speech than with text, click this guy and you’re set. 😛
2. This window (along with the blue bar there) is the preview window for what will appear in game. This way you can get a feeling for the context of the dialog, along with a preview of about what the subtitle should look like in game.
3. This half of the boxes down there contains the original text that you are translating from, in this case Japanese. These boxes can’t be edited (because they never should need to be edited). Also, the blue underlines you are seeing are know terms and expressions, if you highlight them you can see what they translate into. You can also create new “known terms” by right clicking text and adding a translation for them.
4. This half of the boxes are the editable side, which in this case is English. The edits you make are saved as you work, after you edit a box and select a different one it will update the contents of that dialog entry for everyone else to see.
5. This bit of information over here contains some technical information that gives that exact dialog entry an identity of it’s own. Next you have the name of the last user to edit that specific dialog box. Then, lastly, underneath the name, you have a time of how long ago the entry was last edited.
6. I’m just going to use this number to sum up all the information in the top right all at once. That has what version of the interface you are using and what percent of the scripts have been translated into the selected language so far. You also have the console button, I’ll look at that later. And lastly, below all that we have what users are currently logged in and working, it also shows what language that are translation from and into, and the blue number there is the script I am working with and what entry of said script I’m working on.
7. Here we have the source language, this drops down and you can change the source language, you have to press the go button to the right there for your choices to take effect.
8. Here is the language you are translating into, again, you have to press the go button for any changes to take effect.
9. Lastly, here we have a drop down menu that allows you to choose what script you are working with, you can also use those arrow buttons to just skip back to the previous script or right to the next one.
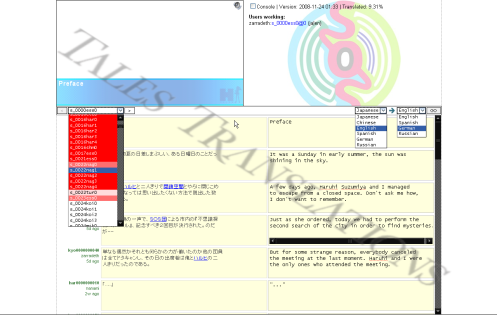
Now that you have a basic overview of the interface, I’ll show you guys up a few closer looks at some of the features mentioned earlier. Some of these pics are photoshopped together so that I can show the same information in 1 picture instead of 3, just so you don’t wonder how I opened 3 drop downs at once. 😛
This one is pretty much self explanatory if you read the stuff above, the only thing to explain is the red colors on the drop down menu for the script selection. The really strong red color means the script is complete, white means it is still unedited. Any color in between those two means that it is started but incomplete, the stronger the red, the closer to completion it is.
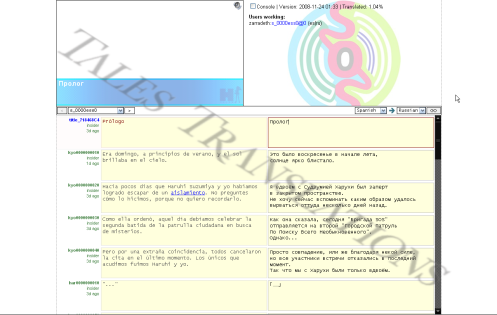
This is just a simple example of having different languages selected. Click it for a larger version.
This one is self exploratory as well, it’s just an example of using different languages. Here Spanish is the source language and Russian is the language that is being translated into. You can also notice that the information next to my username has changed to reflect this.
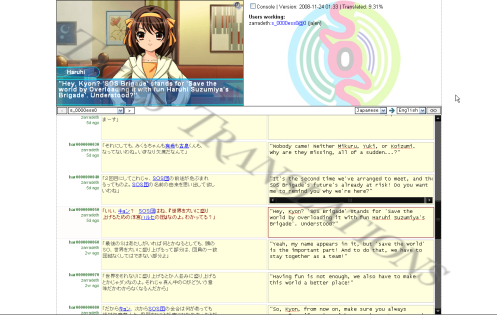
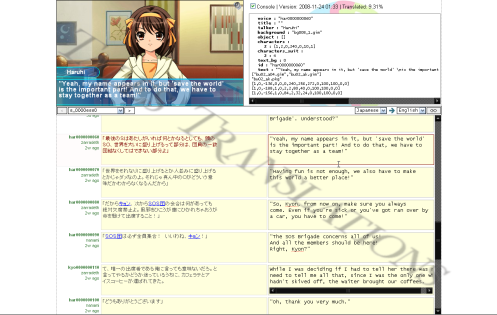
Here’s a scene preview, not too many special things to take note of. The box that is currently selected has a red outline and the source text that correlates to the selected entry is highlighted in red. Also, if you haven’t noticed, the text in the currently selected box is what is being previewed, this is updated live as you change the entry.
Here is a preview of the what the console checkbox does and what the console displays. Honestly this probably does need explaining, but then again the it really doesn’t matter what’s in there, translators don’t have to worry about what’s in there. Plus, you can’t even change the information in there, it’s just for reference if it’s ever needed (and it’s used to make the preview).
Annnddddd….. that pretty much concludes my look at the interface. Now you guys know what we’re working with, and now if you want to translate you can get an idea of what you will be working with. This is all ran through your browser, it works best with Firefox and Google Chrome. If you guys have any questions just ask them in the comments on this page, I’ll answer them for you.
-Zarradeth

I just wanted to comment and say that this online method of translating is genius! I’d bet you that this would be amazing for other visual novel translations as well.
Unfortunately, my Japanese skills are not very strong. I could only do very basic translations. If you want, I can be an editor (my grammar is quite decent).
Anyways, kudos and good work!
Ahh, this looks a lot easier to translate. How many scripts are there and how many would we need to complete each week per chance
Hey, I’m seeing your ideas for translation seem really solid. I was wondering about starting a translation myself for a game, and was wondering if you guys could give me some info about getting started? Any help would greatly appreciated. Thanks.
It’s not too often you see a PSP translation… Especially one this organized. 🙂
what do u excpect with one of the best animes in the world 🙂 Ohh, FYI im typing on a psp and i wish that there were sites and programs made to get and download by using the browser on the psp, or a patch i could use to make this game english!
The person who developed this is awesome! i have a question though: how would you upload the ROM and download the patch?
Just wondering with the progress at above %50 do you think that there will be another alpha patch in the not so distant future, or will it be left to a 100% full patch?
thanks
This looks very useful. It would be awesome if it could be applied to other translation projects.